
It seemed like a quick and easily project so simple it came from a Mommy Blog and was meant to keep five-year-olds busy.
HA! I was so naive.
First off, in my defense, I did make things way more complicated than they needed to be. My vision was larger than a mere handful of crayons. And that canvas was down right petite. No no no, my masterpiece was going to be a giant explosion of waxy color.
So, for better or worse, I set out to create be an artiste. Here are instructions (plus a few things I learned the hard way).
DIY Cavallini: Reverse Paper Art
Supplies:
- Box of crayons
- Scissors
- Hot glue gun
- White canvas (don't be too ambitious)
- Depending on how poor you are either contact paper or a cut out of a shape you like and rubber cement, double stick tape or a glue stick.
Step 1:

Step 2:

This is a purely gratuitous picture of my getting in the way.
Step 2: (for real):
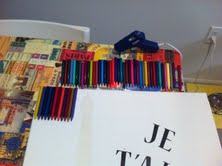 Hot glue a row of crayons at the top. Do not make the mistake I did and unwrap them all. Not only is it time consuming but it also causes the colors to run together more than they normally would once you melt them. The wrappers keep colors separate. I also attempted to use adhesive letters to spell out a French phrase. It didn't work for me as they weren't stuck on well enough and started to fly off the canvas. But if you're feeling creative, give it a try.
Step 3:


Using a hair dryer (It will get everywhere so I recommend stealing your roommate's) begin to melt the crayon wax. Note: Melting it on your kitchen counter with just a box in the background is a TERRIBLE idea. Wax splatters which meant we had to live with a nice rainbow sink and crayon flavored toast for a few days. Save yourself the headache of scrapping off crayon and do this outside or at the very least over newspaper.
Step 4:


The Final Result?
Once the mostly dry peel off the Eiffel Tower (or leaning tower of Piza, elephant, whatever you used). Touch up the outline with white paint and voila!

Mine still needs some touching up. I also went through and peeled off the chunkier pieces of wax and remelted them to make the colors smoother.
Our Cavallini papers are only $4.50 and come in a variety of themes. Whether you're into London, Italy, or Paris, there's something to spark your creative fancy.
See for yourself at www.efvillageshop.com!
No comments:
Post a Comment